This post is all about DIY Sand Tattoos: A Simple Beach Crafts For Kids
I have come to realize that children have a special love for outdoor play, especially when sand is involved. Give them a bucket of sand, a few simple tools, and enough time to explore, and they can stay happily engaged for hours. The feeling of sand between their fingers sparks their imagination and encourages them to create, experiment, and discover new things.
My kids have always enjoyed playing with sand, and I love watching how creative they become during these moments. Sometimes, they use their little hands to mold castles, animals, and different shapes. They turn ordinary sand into something exciting from their imagination.
One of the sand activities my kids especially enjoy is making sand tattoos. They love choosing designs, adding colorful sand, and proudly showing off their little creations. It is such a fun way for them to combine creativity with sensory play while enjoying time outdoors.
DIY sand tattoos are an easy and playful beach craft that brings extra excitement to summer days, beach trips, or even backyard sand play. With just a few simple materials, kids can create their own temporary sand artwork while exploring colors, textures, and patterns.
Whether you are looking for a fun activity to keep their little hands busy or a creative way to make special summer memories, this DIY Sand Tattoos: A Simple Beach Crafts For Kids is sure to bring lots of smiles and excitement.
What Are Sand Tattoos?
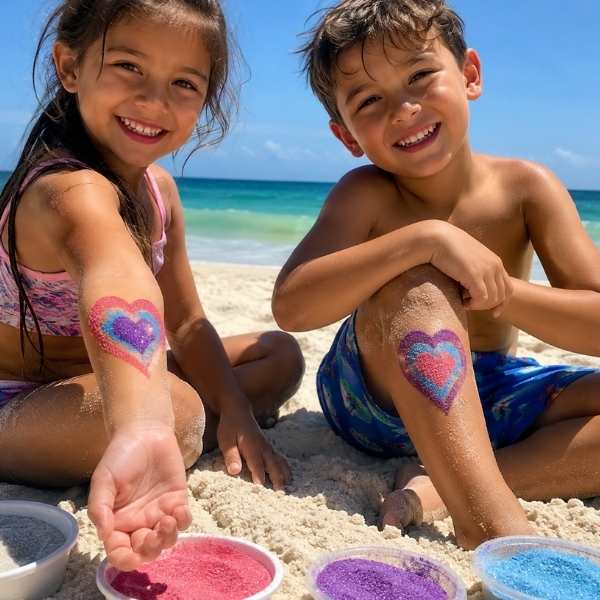
Sand tattoos are a fun and creative way for kids to turn colorful sand into temporary body art. Instead of drawing on paper, children get to create a little design they can wear and show off. This is done with a skin-safe adhesive or stencil. They often add different colors of sand to make beautiful patterns, shapes, or beach-inspired designs.
Kids get so excited whenever they are creating sand tattoos. They get to choose their own designs, mix colors, and enjoy the sensory experience of working with sand. It is a simple activity, but it gives kids the chance to be creative, explore their imagination, and make a fun little memory from their beach day.
Benefits of Making DIY Sand Tattoos With Kids
Below are some of the benefits kids derive from making DIY sand tattoos.
- Encourages creativity and imagination: Kids get the freedom to choose their designs, colors, and patterns, allowing them to express themselves in a fun and playful way.
- Provides a fun sensory experience: Playing with the texture of sand helps children explore different sensations while enjoying a hands-on activity.
- Strengthens fine motor skills: Scooping sand, sprinkling colors, placing designs, and brushing away extra sand help improve hand coordination and control.
- Creates meaningful memories: Making sand tattoos together gives families a simple way to enjoy quality time and create fun memories during beach days or summer play.
- Encourages outdoor learning and exploration : This activity allows kids to enjoy fresh air while learning through play and discovery.
- Builds confidence and pride: Children feel excited and accomplished when they create something unique that they can proudly show others.
Materials for Making DIY Sand Tattoos
With a few simple materials, kids can create colorful sand tattoos and enjoy a fun, creative play experience.
Note: Always use materials that are safe for skin, especially when making crafts with young children. Avoid using regular craft glue, glitter, or products that are not designed for body use.
Below are the materials you should have handy while trying to make sand tattoos.
- Skin-safe adhesive stencils or temporary tattoo stickers.
- Colored sand.
- Small containers or bowls.
- Paint brush.
- Spoon or scoop.
- Clean dry skin (preferably leg and arm).

Easy Steps For Making DIY Sand Tattoos With Kids
Making DIY sand tattoos is a simple and exciting activity that kids can enjoy during beach trips, summer breaks, or outdoor playtime. The process is easy enough for little hands to follow, and children will love watching their designs come to life.
1. Choose a Design
Guide the kids to pick the design they would like to create. Simple shapes like stars, hearts, flowers, seashells, butterflies, and sea animals are great choices for younger children.
2. Prepare the Skin
Choose a clean, dry area of the skin, such as the arm, hand, or leg. Make sure the area is free from water, lotion, or oils so the adhesive can stick properly.
3. Apply the Stencil or Tattoo Design
Carefully place the skin-safe stencil or temporary tattoo sticker onto the chosen area. Press it down gently to make sure the edges are secure and the design stays in place while adding the sand.
4. Add the Sand
Let kids sprinkle their favorite colors of sand over the design. They can use one color or combine several colors to create a unique pattern. This is usually the most exciting part because they get to see their artwork slowly take shape.
5. Brush Away the Extra Sand
Once the design is covered, gently brush away the extra sand using a soft brush. Encourage kids to do this carefully as they reveal their colorful sand tattoo underneath.
6. Show Off Their Beach Artwork
Remove the stencil carefully and let kids admire their finished creations. They will love showing off their handmade sand tattoos and sharing their colorful designs with family and friends.

Fun and Easy Sand Tattoo Design Ideas for Kids
One of the best parts of making DIY sand tattoos is letting kids choose designs that match their personality and imagination. Whether they love the beach, animals, or simple shapes, there are so many fun ideas they can create. Here are some easy sand tattoo designs kids can try out:
1. Heart tattoos.
2. Butterfly tattoos.
3. Flower tattoos.
4. Their name or initials.
5. Their favorite shapes or patterns.
6. Sunshine tattoos
7. Ocean wave tattoos.
8. Ocean animal tattoos.
Tips for Making the Best DIY Sand Tattoos
Creating DIY sand tattoos is a simple activity, but a few helpful tips can make the experience smoother and more enjoyable for kids. These little tricks can help children create beautiful designs while making the process less messy and more fun.
- Use clean, dry sand: Dry sand works best because it sticks better to the adhesive and creates a clearer design. If you are using beach sand, make sure it is clean and free from unwanted debris.
- Choose simple designs for younger kids: Large, easy-to-recognize shapes are easier for little hands to decorate and usually create the best results.
- Make sure the skin is clean and dry: Avoid applying lotions or oils before starting, as they can prevent the adhesive from sticking properly.
- Let kids choose their own colors: Allowing children to pick and combine their favorite colors makes the activity more creative and helps them feel proud of their finished artwork.
- Work in a shaded area: If you are making sand tattoos outdoors, choose a comfortable spot away from direct sunlight. This helps kids stay focused and prevents the sand from becoming too warm.
- Have extra designs ready: Kids often enjoy making more than one tattoo, so having extra stencils or ideas nearby keeps the creative fun going.
- Take pictures of their creations: Sand tattoos may not last forever, but capturing those colorful little designs can help preserve the fun memories from your beach day or summer activity.
You may also see:
Cute Sun Crafts For Preschoolers
Easy Sensory Activities For Toddlers And Preschoolers